maanantai 17. toukokuuta 2021
torstai 10. syyskuuta 2020
maanantai 4. toukokuuta 2020
perjantai 19. huhtikuuta 2019
Bondwell Model 8 - an old laptop from the 80's
Back in the day PCs were not that common but rare and expensive. Using a such PC was pretty straight forward once you knew all the tricks.


Open the image; File, Open. Make sure the floppy is in the drive and recognized by WinImage. Then choose Disk, Format and write disk.


I got a chance to make friends with a PC from year 1985. So please welcome a laptop Bondwell Model 8. It has an Intel 80C88 processor running at 4.77 MHz and 512 KB of RAM. The screen has a resolution of 640 x 200 with 80 x 25 characters. In addition there is a 720 KB built-in floppy drive. You can check the rest of the specifications here: http://www.computinghistory.org.uk/det/6731/Bondwell-Model-8/

Bondwell Model 8
My Bondwell was delivered without a power supply. After some searching I found a power made by Nokia. Polarity, voltage, amperes and the plug - they all matched.

Reuse of an old power supply makes me happy
After firing up it took a moment for the laptop to count all RAM memory (512 KB!). Bondwell Model 8 was originally delivered with MS-DOS 2.11 boot floppy. There was not a such floppy inside the drive. Now what? I had to prepare a one.
WinImage is an app for Windows which writes DOS floppy images on floppies. If you need an image search many places since not all images work. After some browsing a MS-DOS 3.20 image (720 KB) was downloaded and was waiting for writing on a floppy.

A floppy turned from 1.44 MB into 720 KB
with a piece of tape
WinImage is easy to use once you know what to do. Follow these steps:
Open the image; File, Open. Make sure the floppy is in the drive and recognized by WinImage. Then choose Disk, Format and write disk.

A floppy image ready for writing

Writing of the image going on

USB floppy drive TEAC FD-05PUB
It was time to try the boot floppy. And it worked like a charm. Finnish keyboard layout is missing but who cares (you know those funny characters å, ä and ö...).
Using Bondwell Model 8 laptop was like the experience I had in the beginning of the 90's with Toshiba T1100. They both need a boot floppy. My Toshiba had a card hard drive (~2.5 MB) and MS-DOS 3.3 in ROM. Back then Toshiba T1100 was more advanced than Bondwell Model 8. However the owners didn't think of the specs that much. PCs (and laptops in particular) were so expensive you were lucky if you had one!
perjantai 22. helmikuuta 2019
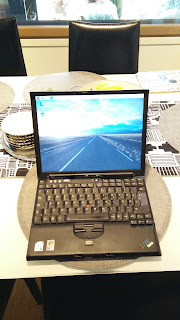
Lenovo Thinkpad X60s (from year 2006) and a modern SSD
In short, it works. An old Lenovo X60s of mine with 2 GB of RAM and Debian Linux installed was lagging. So what next? Disposal? No, that was not an option. So I decided to give X60s the last chance. Off I went and purchased a brand new 120 GB SSD drive for 26 €.
Removing the old HDD was easy; one screw, pull and there you are. After that few more screws and SSD was ready for action. No need to enter the BIOS. SSD drive was automatically detected.
I'm fond of Raspbian (download here: https://www.raspberrypi.org/downloads/ ) which is based on Debian Linux. As it's available for PC the next thing to do was to burn Raspbian ISO on a USB stick. Installing Raspbian took less time than did with the original HDD.
So how is it? Well, I was afraid whether a modern a 3rd generation SSD would work on an old PC or not. SATA III is said to be downward compatible with SATA 1. One has to be careful and read what other userd have experienced. In my case X60s accepted the new SSD drive.
Now I have a very responsive old PC running a modern operating system. A new SSD is the best thing to do when you come across an old PC!
PS What happened to the old HDD? It has a new life as an external HDD!


lauantai 2. helmikuuta 2019
Ubuntu Touch on Nexus 7 (2013) wifi (flo)
Nexus 7 (2013) wifi (codenamed flo) is one of those tablets able to run Ubuntu Touch operating system from UBports. I recently received my used Nexus 7 (2013) wifi and immediately started to install Ubuntu Touch on it. There were issues, not too many:

- First of all, flash Android 4.4. Mine had Android 5 or higher and it's a no-go. Ubuntu Touch won't start. Find Android 4.4 image here: https://developers.google.com/android/images
- Make sure you enable Developer Mode in Android 4.4
- Use Ubuntu Touch installer on Linux when flashing although available for Mac OS and Windows as well. Linux is the best. The other two work if it's a sunny day.
- In case wifi is not working (is not available at all like I had!) on Ubuntu Touch reboot and pray. Worked for me!
- Create a PIN code which also works as a password for root.
That's it! Now I'm a proud owner of a Nexus 7 tablet which is running pure Linux!

My Nexus 7 (2013) wifi (flo) with
Ubuntu Touch installed
sunnuntai 5. marraskuuta 2017
Raspbian on EeePC 1000H
Many of you might think an almost 10 years old mini laptop is an obsolete one. With only 1 GB of RAM (max 2 GB) and a 1.6 GHz Intel Atom processor there is not much you can do in the world of Windows.
After wiping out the proprietary world I decided to give Linux - and especially Raspbian - a go on EeePC 1000H. Raspbian is based on Debian Linux and is known as the OS of the Raspberry Pi. Did you know Raspbian also runs on x86, not only on ARM? The ISO can be downloaded here:


After wiping out the proprietary world I decided to give Linux - and especially Raspbian - a go on EeePC 1000H. Raspbian is based on Debian Linux and is known as the OS of the Raspberry Pi. Did you know Raspbian also runs on x86, not only on ARM? The ISO can be downloaded here:
- Direct link: http://downloads.raspberrypi.org/rpd_x86/images/rpd_x86-2017-06-23/2017-06-22-rpd-x86-jessie.iso
- Torrent: http://downloads.raspberrypi.org/rpd_x86/images/rpd_x86-2017-06-23/2017-06-22-rpd-x86-jessie.iso.torrent
The ISO can be written on a USB stick many ways. If you are already using Linux then try this: sudo dd if=rpd_x86-2017-06-23/2017-06-22-rpd-x86-jessie.iso of=/dev/sdb. You'd better make sure nothing is overwritten! Use Esc to choose USB stick when booting EeePC 1000H. After that, off you go and install Raspbian. Business as usual.
After the setup had finished wifi didn't work. The light was on but EeePC 1000H and Raspbian couldn't find any wifi hotspots. Now what? Ok, after some tweaking I realized there was no driver for the wifi circuit. Off I went and found a suitable solution here: https://wiki.debian.org/DebianEeePC/HowTo/Wifi. First I wired EeePC 1000H and then opened the terminal window and typed in: sudo apt update. After that: sudo apt install firmware-ralink. That did the trick! After reboot EeePC 1000H and Raspbian found my wifi network!
And that's it! My EeePC 1000H is running the best software there is - Raspbian!

EeePC 1000H running Raspbian and Pixel Desktop

First I had to install HDD since there was not one inside
torstai 19. lokakuuta 2017
How to install Ubuntu 17.10 on a 32-bit PC
Ubuntu Linux 17.10 is newly released. The big news is there is no 32-bit ISO available anymore. However Ubuntu Linux can still be installed on a PC with support for 32-bit architecture. Here is how you do it.
Alternative A
First off, download Ubuntu Linux 17.10 32-bit server version here:
Now install Ubuntu Linux. Do not choose any of the server software during the installation since we have Desktop on the way!
Once the installation is ready type in the following command: sudo apt install ubuntu-desktop.
Have some coffee or tea. It takes some time to download and setup all software needed for the Desktop. In addition hope for the best. I had to shutdown my old Acer Aspire One to make Ubuntu finalize the installation. After that Gnome 3 Desktop showed up. Both Wayland and Xorg work.

Alternative B
If the server install above is not working you can download 54 MB mini.iso here: http://cdimage.ubuntu.com/netboot/artful/. Flash ISO onto a USB stick. Next, boot from USB and install. Bear in mind mini.iso includes only the essential files needed for booting and getting started with the install operation. The rest is downloaded. So you need an Internet access with a lot of bandwidth. Once again, hope for the best. Once netinstall is done, type in the same command as in alternative a: sudo apt install ubuntu-desktop.
How was my Acer Aspire One? It didn't like the latter. I guess there is a bigger chance for error when almost every file has to be downloaded, extracted and installed right away. Or it has to do with my hardware. My rusty old mini laptop is only 10 years old.
Alternative A
First off, download Ubuntu Linux 17.10 32-bit server version here:
- Direct download http://www.releases.ubuntu.com/artful/ubuntu-17.10-server-i386.iso
- Torrent http://www.releases.ubuntu.com/artful/ubuntu-17.10-server-i386.iso.torrent
Now install Ubuntu Linux. Do not choose any of the server software during the installation since we have Desktop on the way!
Once the installation is ready type in the following command: sudo apt install ubuntu-desktop.
Have some coffee or tea. It takes some time to download and setup all software needed for the Desktop. In addition hope for the best. I had to shutdown my old Acer Aspire One to make Ubuntu finalize the installation. After that Gnome 3 Desktop showed up. Both Wayland and Xorg work.

One can choose between Wayland and Xorg
Alternative B
If the server install above is not working you can download 54 MB mini.iso here: http://cdimage.ubuntu.com/netboot/artful/. Flash ISO onto a USB stick. Next, boot from USB and install. Bear in mind mini.iso includes only the essential files needed for booting and getting started with the install operation. The rest is downloaded. So you need an Internet access with a lot of bandwidth. Once again, hope for the best. Once netinstall is done, type in the same command as in alternative a: sudo apt install ubuntu-desktop.
How was my Acer Aspire One? It didn't like the latter. I guess there is a bigger chance for error when almost every file has to be downloaded, extracted and installed right away. Or it has to do with my hardware. My rusty old mini laptop is only 10 years old.
lauantai 9. syyskuuta 2017
How to install Raspbian with Pixel Desktop on a 4 GB SD card
I have an "old" 1st generation Raspberry Pi with only 256 MB of RAM. The most suitable OS for this sort of hardware would be Linux with no GUI. However it's possible to run Pixel Desktop on the oldest Raspi if you like. I wanted give it a go to see how fast (or slow) Raspbian really is on Raspi 1.
One might think it's easy task to download the latest Raspbian (with GUI included), write it on an SD card and fire up Raspi. Well, I only had a 4 GB SD card. Bummer! A 8 GB SD card is required nowadays. The image fits no more on an a 4 GB card.
So I was forced to:
Follow these steps to make Raspbian with GUI fit on a 4 GB SD card:
How is it? Does it work? All's well! The OS is steady, a bit sluggish though. On the other hand there is a lot of room for software left on SD card since I never installed for example LibreOfffice or Wolfram. My Raspbian is a slimmed down version - only the necessities are there! Pixel Desktop which I'm used to is there as well. In fact, I'm really pleased with my Raspbian.
Did I figure out all of this by myself? Nope. I followed other users instructions found on the Internet. Here you are, some additional reading: https://www.raspberrypi.org/forums/viewtopic.php?t=133691


One might think it's easy task to download the latest Raspbian (with GUI included), write it on an SD card and fire up Raspi. Well, I only had a 4 GB SD card. Bummer! A 8 GB SD card is required nowadays. The image fits no more on an a 4 GB card.
So I was forced to:
- Write the image of Raspbian Lite on an SD card and install Raspbian Lite (with no GUI)
- Download and install the rest (GUI and some assisting software)
Follow these steps to make Raspbian with GUI fit on a 4 GB SD card:
- Download the latest Raspbian Lite here: https://www.raspberrypi.org/downloads/raspbian/
- Write Raspbian Lite on a 4 GB SD card and boot your Raspi (any Raspi will do)
- Login and type-in the following command: sudo raspi-config
- Once inside raspi-config localize your Raspbian, use Turbo mode to over-clock your raspi, reduce screen memory to 16 MB and let Raspbian populate the whole SD card etc.
- Update and upgrade Raspbian:
- sudo apt update
- sudo apt upgrade
- Install xserver: sudo apt-get install --no-install-recommends xserver-xorg
- Install xinit to make xorg display server to launch: sudo apt-get install --no-install-recommends xinit
- Install lightdm: apt install lightdm (apt purge lxde removes lxde which is not needed)
- Install bare bone version of Pixel Desktop, terminal app and Recycle Bin: sudo apt-get install --no-install-recommends raspberrypi-ui-mods lxterminal gvfs
- Install GUI version of raspi-config: apt-get install rc-gui (may need reboot after install)
- Now, thumbs up and reboot!
What about the hard disk and memory consumption? Try the following commands:
- To find out the amount of free RAM memory: free -m
- To find out how much free space is left on hard disk: df -h
How is it? Does it work? All's well! The OS is steady, a bit sluggish though. On the other hand there is a lot of room for software left on SD card since I never installed for example LibreOfffice or Wolfram. My Raspbian is a slimmed down version - only the necessities are there! Pixel Desktop which I'm used to is there as well. In fact, I'm really pleased with my Raspbian.
Did I figure out all of this by myself? Nope. I followed other users instructions found on the Internet. Here you are, some additional reading: https://www.raspberrypi.org/forums/viewtopic.php?t=133691

The good ole Pixel Desktop!

1st generation Raspberry Pi
with only 256 MB of RAM

Pixel Desktop up and running!
Still some memory and HD left!
lauantai 2. syyskuuta 2017
Tiny Core Linux 9 on a 1st gen Raspberry Pi
As Raspbian is becoming bloated and will not run that fast on an old 1st generation Raspberry Pi (especially with GUI) I started to look for and alternative distro. After searching I came across Tiny Core Linux (TCL) - a tiny and quick distro which loads entirely to RAM and runs from there. TCL can be downloaded here: http://distro.ibiblio.org/tinycorelinux/ports.html. The image is only 50 MB in size and fits on any SD-card.
If you are still with me and are going to flash TCL read on very carefully. After flashing use Gparted on Linux (I have no idea what to do if you have Windows) and enlarge the second partition so that all the software and extensions you are going to install fit on your SD-card (see next phase below).
Now, fire up your Raspi and TCL. Type-in the following command: tce-load -iw TC. Make sure you are wired to the Internet. When TCL has downloaded and installed all required packages reboot your system. A graphical user interface should show up.
I tested TCL on an "old" 1st generation raspberry Pi (not the very first one though!) with 512 MB of RAM. It took ~ 10 seconds to boot to CLI (that is no graphical user interface, command-line only) and 20-30 seconds to GUI. Not bad! Besides you can remove the SD-card if you like. The whole OS runs from RAM memory! Cool!
Ok, enough for now. Still to-do: keyboard layout is US and needs fixing. No apps installed so I need to find some sort of tool for that task. I'll be back!

TCL with GUI

Composite video!

Time flies! 2011-12!
lauantai 24. kesäkuuta 2017
An old Dell Latitude X1 is now running the latest Raspbian from hard disk
Now that Raspbian is available as an installable ISO for an x86 PC I decided to give it a go on my rusty old Dell Latitude X1.
With only 1 GB of RAM my Dell is able to run a Linux which consumes as little resources as possible. Raspbian is based on Debian Linux and is equipped with a modified and light window manager - suitable for my needs.
If you want to download the latest (summer 2017) Raspbian for x86 (i.e. Intel-compatibel processor) you can either use direct link or download a torrent file below:
Once the ISO was downloaded I burned it on a USB stick. Next, I booted Dell from USB. The setup was familiar from Debian. The only annoying thing was my wifi dongle was not recognized. So I was forced to use an external one from König. No problem with that dongle. The driver was automatically loaded and the dongle worked out-of-the-box.
Raspbian x86 on hard disk really made my day! I'm going to migrate to Raspbian on all of my platforms! It's already running on my Raspies and from now on on my PCs as well!


König USB Wifi dongle


It's official! Run Raspbian from hard disk on your PC!
For a while it's been possible to run Raspbian from USB stick on PC. From now on you can install Raspbian on the hard disk of your PC!
If you want to give Raspbian on PC a go please make sure to back up your hard drive before installing. All your information will be earsed during the setup.
Download the ISO image here: http://downloads.raspberrypi.org/rpd_x86/images/rpd_x86-2017-06-23/2017-06-22-rpd-x86-jessie.iso
Or if you prefer torrent, use the following link: http://downloads.raspberrypi.org/rpd_x86/images/rpd_x86-2017-06-23/2017-06-22-rpd-x86-jessie.iso.torrent
Burn the image on a USB stick and boot your PC from it. Choose Install from Boot Menu (look at the picture below). Run the setup familiar from Debian. When finished you have Raspbian up and running on your PC.
Edit 1: I did let Raspbian populate the hard disk entirely. I guess multi-booting is possible but I haven't tested it yet.
Edit 2: Not all devices work. For example wifi circuit might not be supported by Raspbian ( i.e. Debian).

Choose Install (text-based setup)

An old x86 mini laptop and Raspberry Pi
running Raspbian and Pixel Desktop
sunnuntai 11. kesäkuuta 2017
UBports Installer 0.1.4 beta - an easy way to install Ubuntu Touch on your phone
UBports Installer lets you install Ubuntu Touch on limited variety of smart phones (see picture below). The app is in beta (0.1.4) at the moment.
The Installer is available for Windows, Mac and as an AppImage for Linux! Read more about AppImage here: http://appimage.org/. Download your copy of UBports Installer here: https://github.com/ubports/ubports-installer/releases .
Once the app is downloaded and installed connect your device and hope for the best. Keep in mind all your data will be gone when flashing Ubuntu Touch. Make sure you know how to restore your original OS in case something odd happens. UBports is maintaining a list of supported phones and tablets.

UBports Installer on Windows 10
sunnuntai 28. toukokuuta 2017
Picroft - a special version of Mycroft open source Artificial Intelligence for Raspberry Pi 3
There are many AI (Artificial Intelligence) assistants available like: Siri (Apple), Google Assistant, Amazon Echo and Cortana (Microsoft) which all are proprietary. The only open source AI-tool out there on the Internet is Mycroft. I wanted to give it a go.
Off I went and downloaded Picroft - a ready-made image - for Raspberry Pi 3, burned it on a microSD-card and booted Raspi3. Once Picroft was connected to the Internet a six character code was printed on screen. In order to make AI work Raspi3 needs to be paired at https://home.mycroft.ai using the code. After that I started to speak to Mycroft.
My equipment was not that up-to-date. It seems not all devices work. At first I tried a USB headset from Logitech with no luck. I had to use an old Microsoft web camera as microphone and a headset as speakers. After saying "Hey, Mycroft" Mycroft started listening and answering to me.
How was the conversation with Mycroft? Well, very basic I'd say. For example when asking:"Where is London?", Mycroft had no idea. The president of the USA was known by Mycroft. I wanted to teach Mycroft but I guess it's not allowed.
After a quick test all I can say is Mycroft works almost out-of-the-box on Raspi3. That's good news. I hope Mycroft will soon learn where London is somewhere on this planet. And it will - eventually.
PS Ah, you can install skills via command line and github! That way you can make Mycroft do more tricks. See skills that are available foe downloading (requires a free github account) : https://github.com/MycroftAI/mycroft-skills

Picroft - a special version of
Mycroft runs on Raspberry Pi 3

An old web cam as a microphone

Head set as speakers

The UI of Mycroft on Raspberry Pi 3

Mycroft doesn't know where London is...
lauantai 6. toukokuuta 2017
Charge other devices with your Android phone
Lets say your friend's Android phone is out of charge. Did you know it's possible to lend some battery voltage to other Android phones? Yes, it can be done. Read on!


- First of all, get a USB OTG -cable. They can be found everywhere. Here is one: https://www.verkkokauppa.com/fi/catalog/7744d/USB-OTG for 6,90 € (in Helsinki, Finland).
- Next, find out if your Android phone supports OTG (On The Go). Download and install USB OTG Checker from Play Store. Check your phone to see if USB OTG support exists.
- After the above steps it's time to connect your phone with another phone. Use the USB OTG -cable and your normal USB charging cable. Thumbs up your friend's phone will be charged! And hey, not only phone-phone can be connected but phone-other devices as well (cameras etc).

Charging going on!

Samsung Galaxy S receiving extra power!

USB OTG Checker
user interface
perjantai 17. maaliskuuta 2017
How to turn a year-2004-PC with Windows XP into a modern Linux computer
Yesterday I received a donation; a Fujitsu-Siemens laptop from year 2004 with the following specs:

- 512 MB of RAM
- 60 GB harddisk
- 1.6 GHz Pentium M
- Windows XP on harddisk
- Lubuntu didn't fit in since it requires PAE.
- Debian Linux was also out of the question - it is way too fat operating system nowadays - at least for my tiny PC!
- After those two there were not that many candidates left. Thank heavens Tiny Core Linux made my day! It loads super-fast, offers a simple yet usable desktop and the latest software (for example Firefox- and Chromium-browsers).
I'm testing Fujitsu-Siemens at the moment. Wifi (IPW2200) is built-in and supported by Tiny Core Linux. Localized keyboard is not yet configured but there are instructions available.
Edit: turns out one can install Puppy Linux on harddisk. I will try it next!
Edit: turns out one can install Puppy Linux on harddisk. I will try it next!

Desktop is simple yer usable
lauantai 11. maaliskuuta 2017
Turn your PC into a Chromebook - three distributions to choose from
If you have a spare PC and would like to turn it into a Chromebook you have three differerent flavours to choose from. Let's see what these OSes have to offer.

- Cloudready of Neverware is available for free for individual users. You can choose between 32-bit and 64-bit versions. Bear in mind not all PCs are supported. You can find the list of certified models here. Why would you choose Cloudready? There is a company behind the the distro so updates can be expected to happen. Download here: https://www.neverware.com/freedownload .
- FlintOS is aimed at RaspberryPi 3 and PC. At it's early stages FlintOS is not ready for all PC users just yet. However the project is alive and growing rapidly. So a mature version for PC might show up any time soon. If you are familiar with Raspberry Pi 3 you might want to run FlintOS on both Raspi and PC. Download here: https://flintos.io/download/ .
- Last but not least there is Arnold The Bat's ChromiumOS. Arnold has been offering his version of ChromiumOS long before Cloudready and FlintOS showed up. When nothing works try ChromiumOS. My 10 years old mini laptop accepted Arnold's version while rejecting Cloudready and FlintOS. Download here: https://chromium.arnoldthebat.co.uk/ .
It's pretty easy to download and install ChromiumOS (open source version of ChromeOS) on PC. In addition there are three different alternatives to choose from. So there is no need to buy a Chromebook but to pick up a version of ChromiumOS that suits you and start to play!

Acer Aspire One ZG5 running
Arnold the Bat's ChromiumOS
perjantai 13. tammikuuta 2017
Flint OS turns RaspberryPi 3 into a Chromebox!
Chromeboxes/Chromebooks are very easy-to-use computers. The only app you need to know is web browser. Eventhough Chromeboxes/Chromebooks are relatively cheap devices there is an even more inexpensive option available!
With RaspberryPi 3 SBC (Single Board Computer) and Flint OS you can run a Chromebox of your own. A Raspi can be purchased nowadays almost everywhere on this planet. Adafruit is selling Raspi 3 for 40 $.

All you need to do is to download the image of Flint OS and burn it on an at least class 10 SD card (make sure your card is fast enough!). Fire up your Raspi, login and start browsing the web!
Too good to be true? Well, you can't expect Flint OS and Raspi 3 to run at the same speed as your laptop or desktop computer. In addition, Flint OS has so far only reached the version number 0.2. Flint OS on Raspi 3 is very usable but not for all of us just yet. However Flint OS will mature in near future. So you'd better keep your eye on Flint OS!
Edit: A new and more stable version 0.2.1 “Beetle” was released in February 11th!
Edit: A new and more stable version 0.2.1 “Beetle” was released in February 11th!

Flint OS on RaspberryPi 3
keskiviikko 11. tammikuuta 2017
New version of Raspbian is out (January 11th 2017)!
Raspbian is based on Debian Linux and runs on Raspperry Pi. A new version of Raspbian is out (January 11th 2017)! You can download Raspbian:
Either via Raspberrypi.org web site:
Either via Raspberrypi.org web site:
Or via torrent network:

keskiviikko 4. tammikuuta 2017
How to install Pixel Desktop on hard disk
What is Pixel Desktop?
Pixel Desktop is the default GUI of Raspbian operating system made for Raspberry Pi. Recently Pixel Desktop was released for x86 platform. This means you can run the same desktop on your PC as on Raspberry Pi.
At the moment only Live image of Pixel Desktop is available for x86. You can boot up PC from USB stick but not install Pixel Desktop on your hard disk - officially. However, there is a work-around; Refracta Tools makes it possible for anyone to install Pixel Desktop on hard disk.
The installation on hard disk - take the following steps
After setup you can run (in Terminal-app) sudo apt-get update and sudo apt-get upgrade to get the latest updates and to see if your PC is connected to the Internet.
For all you non-English-keyboard-users: different keyboard layouts are there for you to pick up. Browse Preferences -> Mouse and keyboard settings -> Keyboard tab -> Keyboard Layout button.
What if Refracta Tools doesn't show up? This happened to me. An old Acer ZG5 mini laptop just could not make it. I guess Intel Atom 1,6 GHz with 1 GB of RAM was not enough? No Refracta Tools anywhere eventhough I was able to boot up Acer from USB stick. Well, Asus EeePC 1025C made my day and was willing to receive Pixel Desktop and is now my number one laptop!
What if wifi doesn't work etc.? This, too, can happen. Bear in mind Pixel Desktop is there only helping you with your everyday tasks. It's Debian Linux under the surface that takes care of for example drivers. Off you go and look for help on the internet if your hardware fails. There are many Debian-concentrated discussion forums available.
An official installer of Pixel Desktop is arriving later this year (2017). Before that Refracta Tools and a derived version from Exton Linux help you to perform hard disk setup of Pixel Desktop.


Pixel Desktop is the default GUI of Raspbian operating system made for Raspberry Pi. Recently Pixel Desktop was released for x86 platform. This means you can run the same desktop on your PC as on Raspberry Pi.
At the moment only Live image of Pixel Desktop is available for x86. You can boot up PC from USB stick but not install Pixel Desktop on your hard disk - officially. However, there is a work-around; Refracta Tools makes it possible for anyone to install Pixel Desktop on hard disk.
The installation on hard disk - take the following steps
- First of all, think twice before you do anything. Do understand it's all happening at your own risk! Ok, go on and download a derived version of Pixel Desktop with Refracta Tools pre-installed here: https://sourceforge.net/projects/debian-pixel/ . It's made by Exton Linux and you can read more at Exton Linux web site: Run Raspberry Pi PIXEL Desktop on a PC or Mac – an Exton modified Build 161223 with Refracta Tools .
- Next, burn the image on a USB stick (2 GB stick is big enough). Use your favourite app to do that. There are many apps to choose from; Win32DiskImager for Windows, command dd for Linux etc.
- Finally, boot up your PC from Live USB stick. Once the graphical user interface is up and running look for System Tools -> Refracta Installer (see the picture below). You need to create and choose at least one partition for Pixel Desktop on hard disk. A wizard helps you and launches an app for partitioning. In the end of install you'll be asked to type in passwords for Pixel Desktop.
Aftermath
After setup you can run (in Terminal-app) sudo apt-get update and sudo apt-get upgrade to get the latest updates and to see if your PC is connected to the Internet.
For all you non-English-keyboard-users: different keyboard layouts are there for you to pick up. Browse Preferences -> Mouse and keyboard settings -> Keyboard tab -> Keyboard Layout button.
What if Refracta Tools doesn't show up? This happened to me. An old Acer ZG5 mini laptop just could not make it. I guess Intel Atom 1,6 GHz with 1 GB of RAM was not enough? No Refracta Tools anywhere eventhough I was able to boot up Acer from USB stick. Well, Asus EeePC 1025C made my day and was willing to receive Pixel Desktop and is now my number one laptop!
What if wifi doesn't work etc.? This, too, can happen. Bear in mind Pixel Desktop is there only helping you with your everyday tasks. It's Debian Linux under the surface that takes care of for example drivers. Off you go and look for help on the internet if your hardware fails. There are many Debian-concentrated discussion forums available.
An official installer of Pixel Desktop is arriving later this year (2017). Before that Refracta Tools and a derived version from Exton Linux help you to perform hard disk setup of Pixel Desktop.
Refracta Installer helps you to setup
Pixel Desktop on your hard disk
Asus EeePC 1025C running Pixel Desktop
from hard disk - no USB stick needed
Tilaa:
Blogitekstit (Atom)